VPN
A VPN (virtual private network) is a closed logical network in which the participants are physically separated from each other and connected via an IP tunnel. With this VPN, you can access a local network, e.g. the company network, while on the road or from your home office. This requires VPN software that is both communicating with the network’s router and installed on the computer you want to use to access the network. There are different types of VPN connections (tunnels) that can be configured under this menu item on the TK 100 series.

Overview of the existing VPN connections. With Add a new tunnel can be created, see 3.6.2.
IPSec Settings
In this menu item you configure the settings for IPSec, which can be reached via VPN > IPSec Settings.

Name |
Description |
Default |
|---|---|---|
Enable NAT-Traversal (NATT) |
Click to enable |
Disabled |
Keep alive time interval of NATT |
Set the duration for maintaining the NATT |
60 Seconds |
Enable Compression |
Enable or disable compression |
Enabled |
Debug |
Switch debug mode on or off |
Disabled |
Force NATT |
Switch Force NATT on or off |
Disabled |
Dynamic NATT Port |
Enabling or disabling a dynamic NATT port |
Disabled |
The address change via NAT is interpreted by a VPN gateway as a security-critical change to the data packets, the VPN negotiation fails, and no connection is established. These problems occur, for example, when dialing in via some UMTS mobile networks, where the network operator’s servers do not support address conversion in connection with IPSec-based VPNs.
In order to be able to successfully establish a VPN connection in these cases, NATT (NAT Traversal) provides a method to overcome these problems when handling data packets with changed addresses.
NATT can only be used for VPN connections that use ESP (Encapsulating Security Payload) for authentication. Unlike AH (Authentication Header), ESP does not take the IP header of the data packets into account when determining the hash value for authentication. The hash value calculated by the receiver therefore corresponds to the hash value entered in the packets
IPSec Tunnels
Via VPN > IPSec Tunnels you can set up an appropriate tunnel.
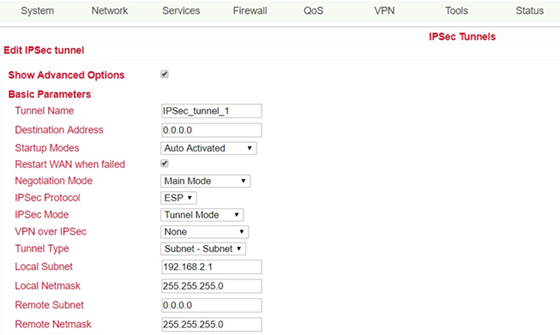

This page presents the web-based parameters for the TK100.
Name |
Description |
Default |
|---|---|---|
Show Advanced Options |
Click to enable Advanced Options |
Disabled |
Basic Parameters |
||
Tunnel Name |
Name for the tunnel |
IPSec_tunnel_1 |
Destination Address |
Set the destination address of the IPSec VPN server |
Empty |
Startup Modes |
Possible modes are “Auto Active” / “Triggered by Data” / “Passive” / “Manually Activated” |
Enabled |
Restart WAN when failed |
WAN interface is restarted if tunnel establishment fails |
Enabled |
Negotiation Mode |
Optional: “Main Mode” or “Aggressive Mode” |
Main Mode |
IPSec Protocol |
Optional: “ESP” or “AH” |
ESP |
IPSec Mode |
Optional: “Tunnelmode” or “Transport Mode” |
Tunnel Mode |
VPN over IPSec |
L2TP or GRE over IPSec |
None |
Tunnel Type |
Selection field for various settings |
Subnet - Subnet Mode |
Local Subnet |
Set protected IPSec subnet (Local) |
192.168.2.1 |
Local Netmask |
Set protected IPSec subnet mask (Local) |
255.255.255.0 |
Remote Subnet |
Set protected IPSec subnet (remote) |
0.0.0.0 |
Remote Netmask |
Set protected IPSec subnet mask (remote) |
255.255.255.0 |
Phase 1 Parameters |
||
IKE Policy |
Multi selection for the policy |
3DES-MD5-96 |
IKE Lifetime |
Set IKE validity period |
86400 seconds |
Local ID Type |
Selection of “FQDN” ; “USERFQDN” or “IP-Address” possible |
IP-Address |
Remote ID Type |
Selection of “IP-Address” ; “USERFQDN” ; or “FQDN” possible |
IP-Address |
Authentication Type |
Selection of “Shared Key” or “Certificate” possible |
Shared Key |
Key (If the authentication type “Shared Key” is selected) |
Set IPSec key for VPN negotiation |
Empty |
XAUTH Parameters |
||
XAUTH Mode |
Enable XAUTH |
Disabled |
XAUTH Username |
XAUTH Username |
Empty |
XAUTH Password |
XAUTH Password |
Empty |
MODECFG |
MODECFG |
Disabled |
Phase 2 Parameters |
||
IPSec Policy |
Multi-selection list for the policy |
3DES-MD5-96 |
IPSec Lifetime |
Set IPSec validity period |
3600 seconds |
Perfect Forward Secrecy (PFS) |
Optional “Disable”; “Group1”; “Group2”; “Group5” |
Disabled (Enable advanced options) |
Link Detection Parameters |
||
DPD Time Interval |
Set DPD Time Interval |
60 seconds |
DPD Timeout |
Set DPD Timeout |
180 seconds |
ICMP Detection Server |
Set server for ICMP detection |
Empty |
ICMP Detection Local IP |
Set local IP for ICMP detection |
Empty |
ICMP Detection Interval |
Set interval for ICMP detection |
60 seconds |
ICMP Detection Timeout |
Set timeout for ICMP detection |
5 seconds |
ICMP Detection Max Retries |
Set maximum number of retries for ICMP detection |
10 |
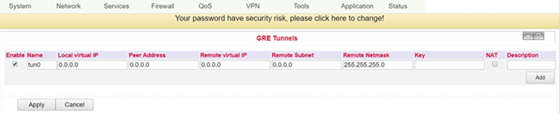
GRE Tunnels
Generic Routing Encapsulation (GRE) is a network protocol developed by the Cisco company and defined in RFC 1701. GRE can be used to wrap other protocols and thus transport them in an IP tunnel. GRE uses the IP protocol 47, the GRE header is structured as follows:
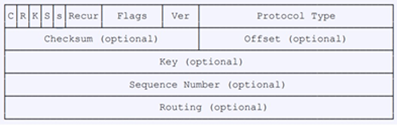
A GRE packet therefore consists of an IP header, a GRE header and the actual payload. You can set up this GRE tunnel under VPN > GRE Tunnels.
Name |
Description |
Default |
|---|---|---|
Enable |
Click to enable |
Enabled |
Tunnel Name |
Set name for GRE tunnel |
tun0 |
Local Virtual IP |
Set local virtual IP |
0.0.0.0 |
Peer Address |
Set peer address |
0.0.0.0 |
Remote Virtual IP |
Set virtual IP of the remote network |
0.0.0.0 |
Remote Subnet Address |
Set remote subnet address |
0.0.0.0 |
Remote Subnet Netmask |
Set remote subnet mask |
255.255.255.0 |
Key |
Set the key for the encryption of the tunnel |
Empty |
NAT |
Click to enable NAT function |
Disabled |
Description |
Add description |
Empty |
L2TP Clients
Layer 2 Tunneling Protocol (L2TP) is a network protocol that tunnels frames of OSI model link layer protocols through routers between two networks over an IP network. L2TP routers and the IP connections between them appear as L2 switches. The L2TP client establishes the connection to the L2TP server here. You can reach the configuration via VPN > L2TP Clients.
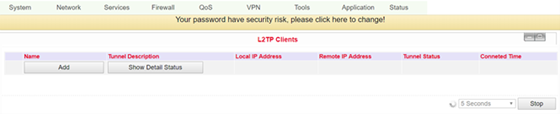
Click on the Add button to start the configuration of the L2TP client.

Name |
Description |
Default |
|---|---|---|
Enable |
Enables the tunnel settings |
Enabled |
Tunnel Name |
Set name for the tunnel |
L2TP_TUNNEL_1 |
L2TP Server |
Set the address of the L2TP server |
Empty |
Username |
Set username for server |
Empty |
Password |
Set password for server |
Empty |
L2TP Server Name |
Set names for server |
l2tpserver |
Startup Modes |
Set modes for startup: “Auto Activated”; “Triggered by Data”; “Manually Activated”; “L2TP0-verIPSec” |
Auto Activated |
Authentication Type |
Set authentication type “CHAP”; “PAP” |
CHAP |
Enable Challenge Secrets |
Select to enable secret keys (challenge) |
Disabled |
Challenge Secrets |
If Enable Challenge Secrets is enabled, the secret key can be entered here |
Empty |
Local IP Address |
Set local IP address |
Empty |
Remote IP Address |
Set remote IP address |
Empty |
Remote Subnet |
Set remote subnet |
Empty |
Remote Subnet Netmask |
Set remote subnet mask |
255.255.255.0 |
Link Detection Interval |
Set interval for link detection |
60 |
Max Retries for Link Detection |
Set maximum number of retries for link detection |
5 |
Enable NAT |
Click to enable NAT |
Disabled |
MTU |
Set MTU parameters |
1500 |
MRU |
Set MRU parameters |
1500 |
Enable Debug Mode |
Click to enable debug mode |
Disabled |
Expert Options |
Set expert options |
Empty |
PPTP Clients
PPTP (Point to Point Tunneling Protocol) is a VPN tunneling method for remote access connections. It is based on the Remote Access Server for Microsoft Windows NT including authentication. A PPTP client is integrated not only in Windows, but also in Linux and MacOS. Set up the PPTP client under VPN > PPTP Clients.
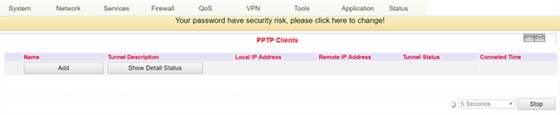
To set up a new PPTP client, click on the Add button. To view details of an existing PPTP client, click the Show Detail Status button. After clicking the Add button, you can make the following configuration settings.
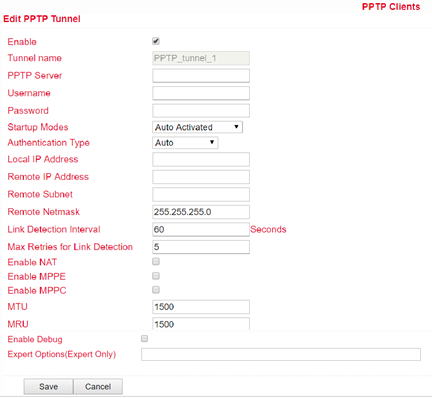
Name |
Description |
Default |
|---|---|---|
Enable |
Click to enable |
Enabled |
Tunnel Name |
the name for the tunnel (set automatically) |
PPTP_tunnel_1 |
PPTP Server |
Set address for PPTP server |
Empty |
Username |
Set username for server |
Empty |
Password |
Set password for server |
Empty |
Startup Mode |
Set modes for start: “Auto Activated”; “Triggered by Data”; “Manually Activated” |
Auto Activated |
Authentication Type |
Set authentication type: “PAP”; “CHAP”; “MS-CHAPv1”; “MS-CHAPv2” |
Auto |
Local IP Address |
Set local IP address |
Empty |
Remote IP Address |
Set remote IP address |
Empty |
Remote Subnet |
Set remote subnet |
Empty |
Remote Subnet Netmask |
Set remote subnet mask |
255.255.255.0 |
Link Detection Interval |
Set interval for link detection |
60 |
Max Retries for Link Detection |
Set maximum number of retries for link detection |
5 |
Enable NAT |
Click to enable NAT |
Empty |
Enable MPPE |
Click to enable MPPE (Microsoft Point to Point Encryption) |
Empty |
Enable MPPC |
Click to enable MPPC (Microsoft Point to Point Compression) |
Empty |
MTU |
Set MTU parameters |
1500 |
MRU |
Set MRU parameters |
1500 |
Enable Debug Mode |
Click to enable debug mode |
Empty |
Expert Options |
Only for Welotec R&D |
Empty |
OpenVPN Tunnels
OpenVPN is a free software for setting up a Virtual Private Network (VPN) over an encrypted TLS connection. The OpenSSL library is used for encryption. OpenVPN uses either UDP or TCP for transport.
OpenVPN is licensed under the GNU GPL and supports operating systems such as Linux, Windows, iOS and a variety of customized Linux-based endpoints such as TK 500 and TK 800 series routers.
On the TK100 configuration page, select the VPN > Open VPN Tunnels options as shown below:
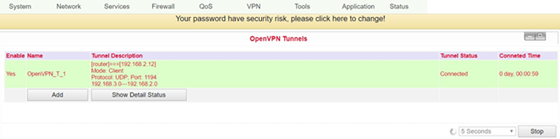
Click Add to add a new OpenVPN tunnel. With Show Detail Status you can view the status of an already configured OpenVPN tunnel.
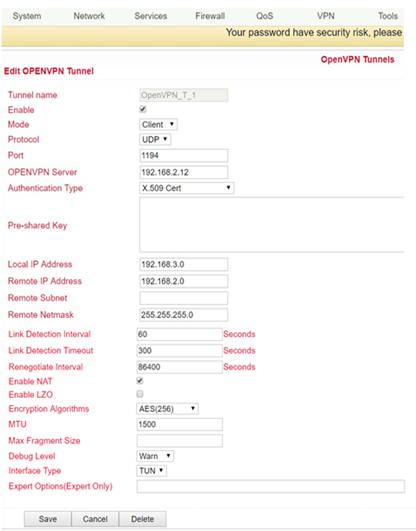
Name |
Description |
|---|---|
Tunnel name |
Preset |
Enable |
Enable this configuration |
Mode |
Select “Client” or “Server” mode |
Protocol |
Selection of the “UDP” or “TCP” protocol |
Port |
Default port for OpenVPN is 1194 |
OPENVPN Server |
IP or DNS of the OpenVPN server |
Authentication Type |
Selection of the authentication type. Depending on the selection, different fields are available |
Pre-shared Key |
Set static password if Pre shared Key, shared key or TLS-AUTH is selected |
Remote Subnet, Remote Netmask |
Set static route of the router, always in the direction of the peer’s subnet |
Username/Password |
If User/Password is selected, the corresponding data is entered in these fields |
Link Detection Interval, Link Detec- tion Timeout |
Always use default |
Renegotiate Interval |
Always use default |
Enable NAT |
Set NAT mode, in the meantime routing mode is disabled |
Enable LZO |
Enable LZO compression |
Encryption Algorithms |
Set encryption algorithm, must match server |
MTU |
Always use default, 1500 |
Max Fragment Size |
Maximum size of individual packets |
Debug Level |
Selection of debug outputs in the log |
Interface Type |
TUN / TAP |
Expert Options (Expert Only) |
More OpenVPN commands (only for experienced users) |
OpenVPN Advanced
This configuration page is only used for the OpenVPN server and provides advanced functions. You can reach this menu item via VPN > OpenVPN Advanced.
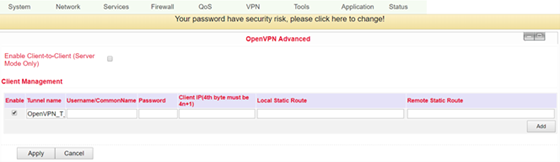
Name |
Description |
|---|---|
Enable Client-to-Client (Server Mode Only) |
Enable client access to other clients |
Client Management |
|
Enable |
Enabling the function |
Tunnel Name |
Tunnel name of the client |
Username/Common Name |
Username (using username/password mode) or common name in CA (CA mode) |
Client IP |
Specify the client IP address |
Local Static Route |
Subnet of the client |
Remote Static Route |
Subnet of the server |
CA can only be created from the customer’s PC, not from TK100.
Certificate Management
Under the menu item VPN > Certificate Management you can include the certificates that you want to use for your VPN connections. You can also export already existing certificates.
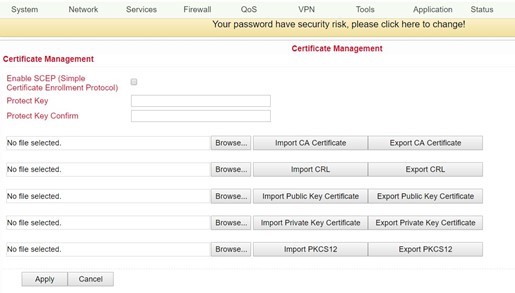
Name |
Description |
Default |
|---|---|---|
Enable SCEP |
Click to enable |
|
Protect Key |
Set a key to protect the certificates |
Empty |
Protect Key Confirm |
Confirm the key to protect the certificates |
Empty |
Import/Export CA Certificate |
Import or export CA certificate |
Empty |
Import/Export Certificate (CRL) |
Import or export CRL certificate |
Empty |
Import/Export Public Key Certificate |
Import/export public key certificate |
Empty |
Import/Export Private Key Certificate |
Import or export private key certificate |
Empty |
Import/Export PKCS12 |
Import or export PKCS12 (private key and X.509 certificate) |
Empty |
Browse |
Via Browse the respective file is selected and can then be imported |
No file selected |
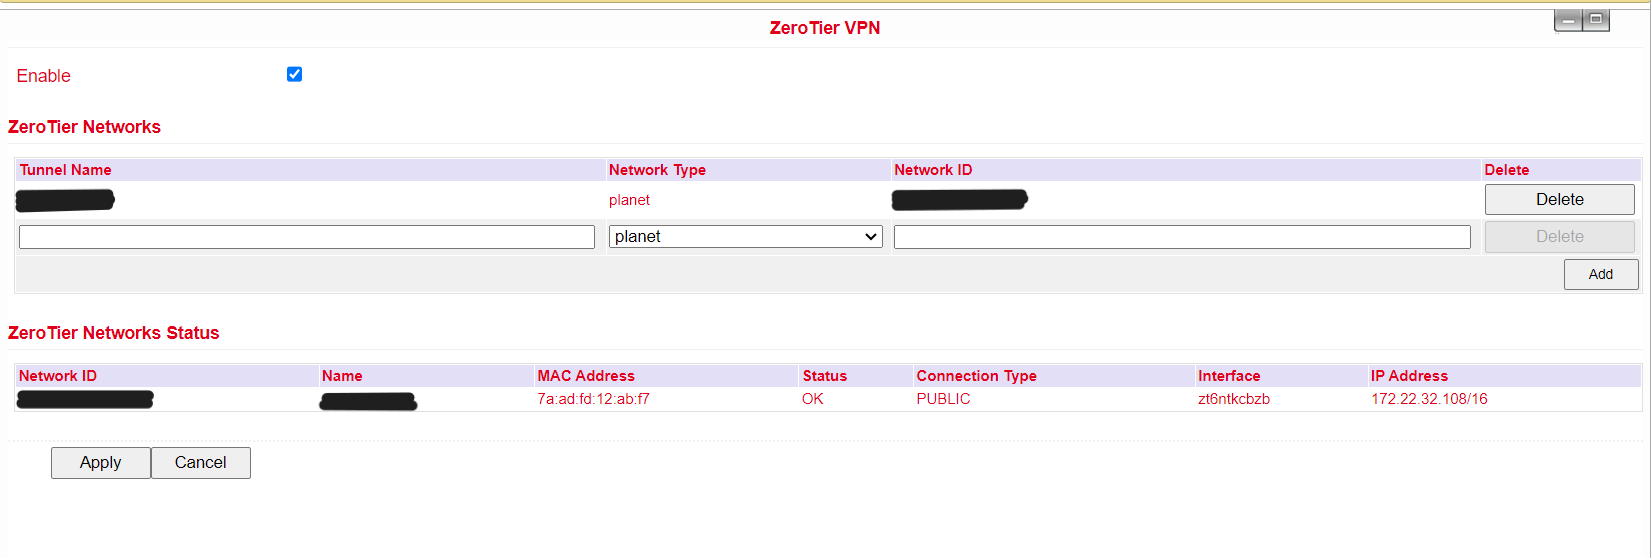
ZeroTier
On the TK100 configuration page, select VPN > ZeroTier.
To set up a new ZeroTier Network, click Enable. Then the ZeroTier Networks and the ZeroTier Networks Status will be visible. Click on the Add button to add a new network. You can then enter the Tunnel Name, the Network ID and choose between planet and moon as the Network Type. The default Network Type is planet, that being a group of root servers that are maintained by ZeroTier. A moon is a custom set of root servers that are created and managed by the user. Hit Apply to confirm your changes.
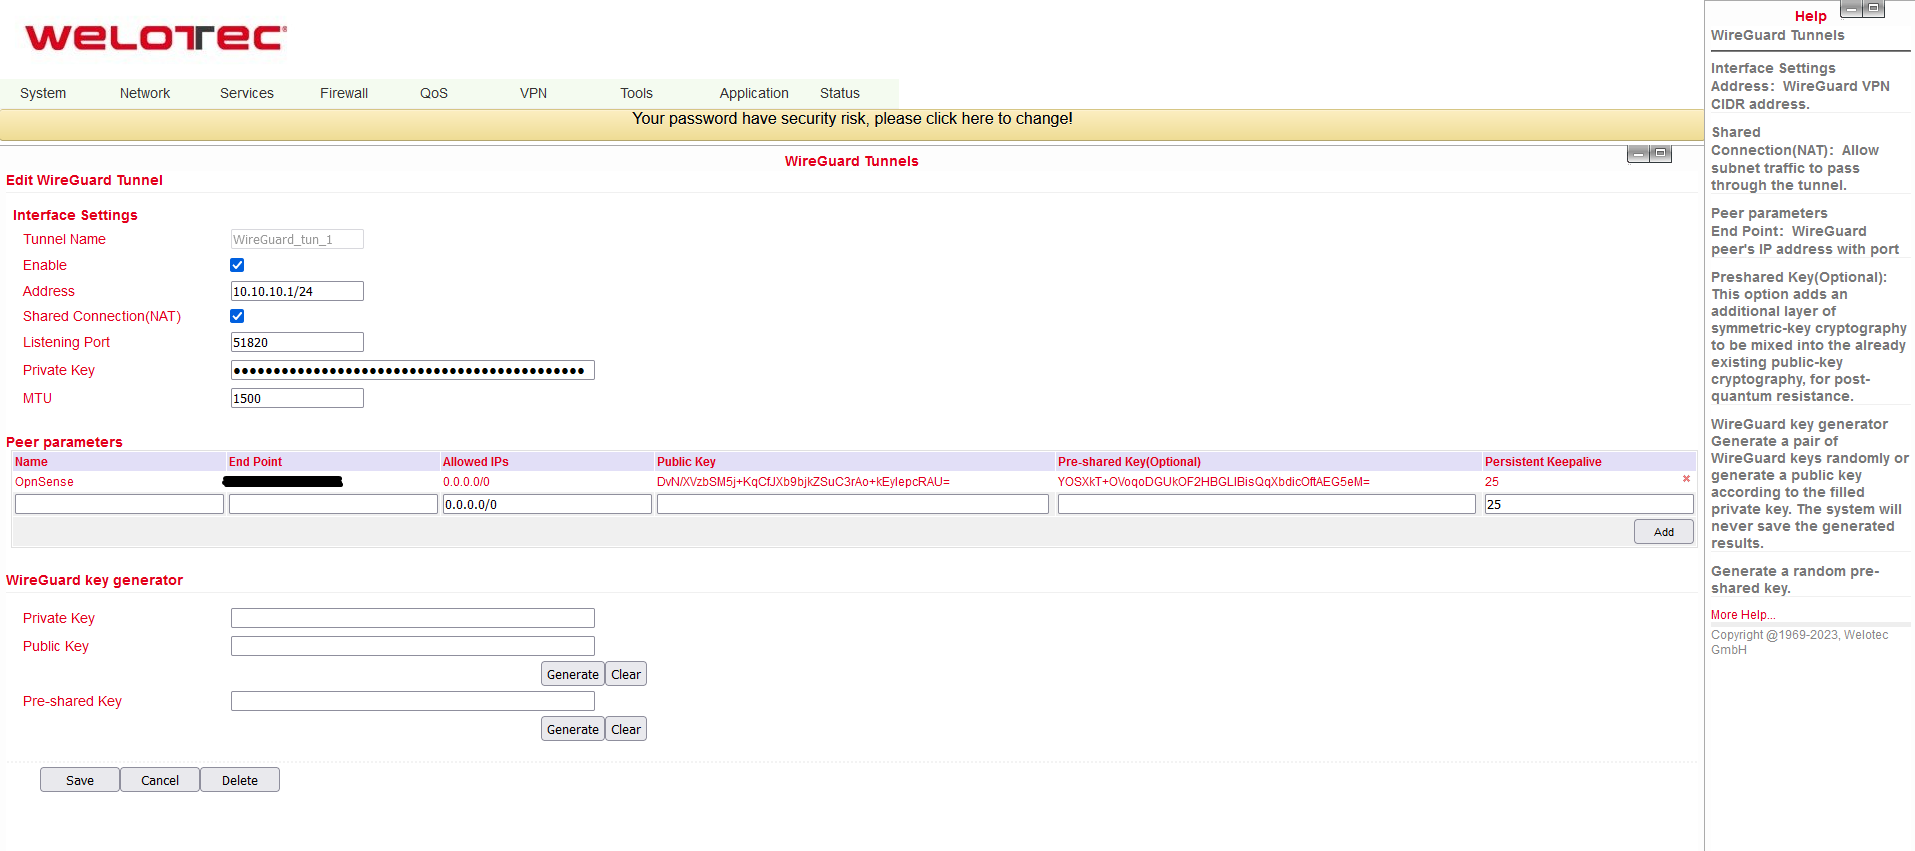
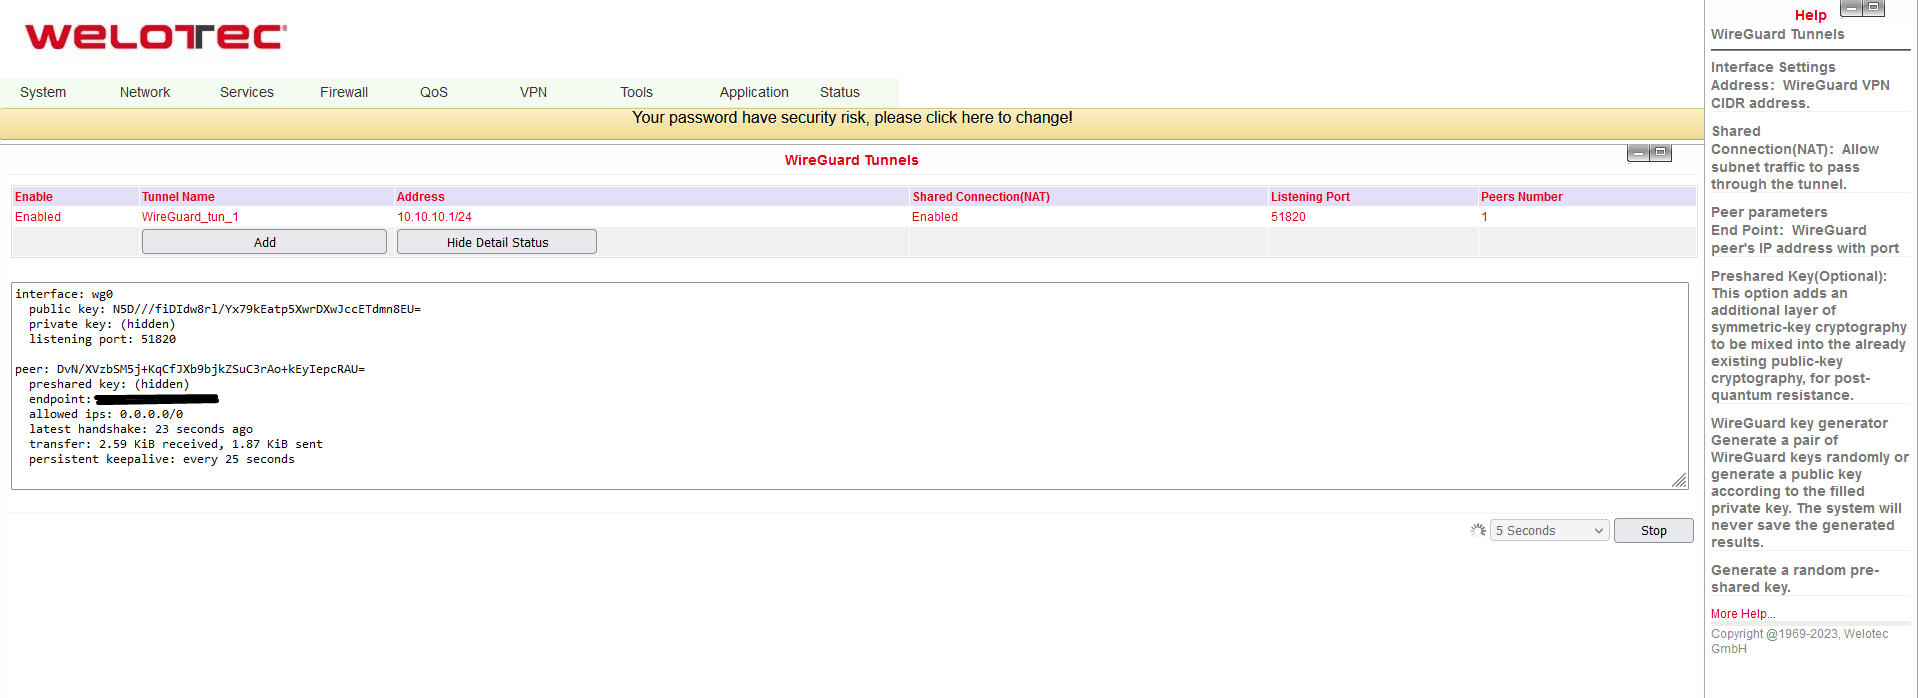
WireGuard
On the TK100 configuration page, select VPN > WireGuard.
To set up a new WireGuard Network, click Add. You will then see the Interface Settings, the Peer parameters and the WireGuard key generator.
Click on the Add button to add a new network. You can then enter the Tunnel Name and the virtual IP address. At the bottom, you can use the key generator to get a Private, a Public and a Pre-shared (optional) key. First, you need to add the generated Private Key to the Interface Settings. Then you take the Public Key of the device you wish to use as a Peer and enter it in the Peer parameters. The Pre-shared Key must be the same for both devices should you choose to use it. For the End Point you must enter the physical IP address of the other device, including the Listening Port.